My Closet Organization
With buzz words like “tidying up,” KonMari” and “spring cleaning” clearly trending, organization is certainly a hot topic but I didn’t realize just how many of you would be so invested in (and inspired by) my recent closet clean-out with Holly from Breathing Room Organization. Hi, Holly! (Spoiler alert: she’s magic)
I shared the process in my Instagram Stories a few weeks ago and there was quite an overwhelming interest in what would be happening with my “donation items” but amidst all of the “Will you be selling on Poshmark?” responses, there were also plenty of questions about the process + the items Holly used to help organize my master closet. So, with the help of Holly, I’m finally sharing more details and photos and, oh, what a difference!
But first…let’s back up.
2019 was the year I vowed to “shop less” and begin to curate a closet of well-worn staples. Classic items I love to wear. Staples that make me feel chic. Items I feel good in. And I have to say, I’ve been really happy with the process. It’s freeing, really. Not feeling like you need every new or trendy item. Giving life to the pieces you love most. Feeling confident enough to part with styles that no longer suit you.
And yet, my closet didn’t always reflect this. At least in a functional way. I think we’ve all been there. The overwhelming feeling of having plenty of clothes, yet somehow nothing to wear. Not a thing? Really?
It’s stressful: a closet full of items you love…that you can’t see. Where did I put that sweater, again? That lacks function. Why are two tops hanging on one hanger? And so easily piles up in a way that feels like you have too much “stuff” - the exact feeling you’re striving to avoid. Why is my closet floor covered in every shoe I own? Oh, right—because I don’t have a set place for them!
Needless to say, I was thrilled to finally tackle this space. And what I learned with the help of Holly is that it doesn’t have to be some massive, time-consuming process. Really. A few hours of editing and organization can have a huge impact.
The Process
Prior to the big clean out day, Holly came over to get an idea of the space (i.e. my master closet) and find out what I was looking to achieve, if anything specifically. For my own lifestyle and experiences, I came up with the following wants, needs and concerns:
Creating some sort of “capsule wall,” i.e., a space edited down (somewhat) to my most-worn pieces.
A home for my shoes so they don’t always end up scattered on the floor.
A section reserved for all my upcoming posts or “new-in” items to shoot.
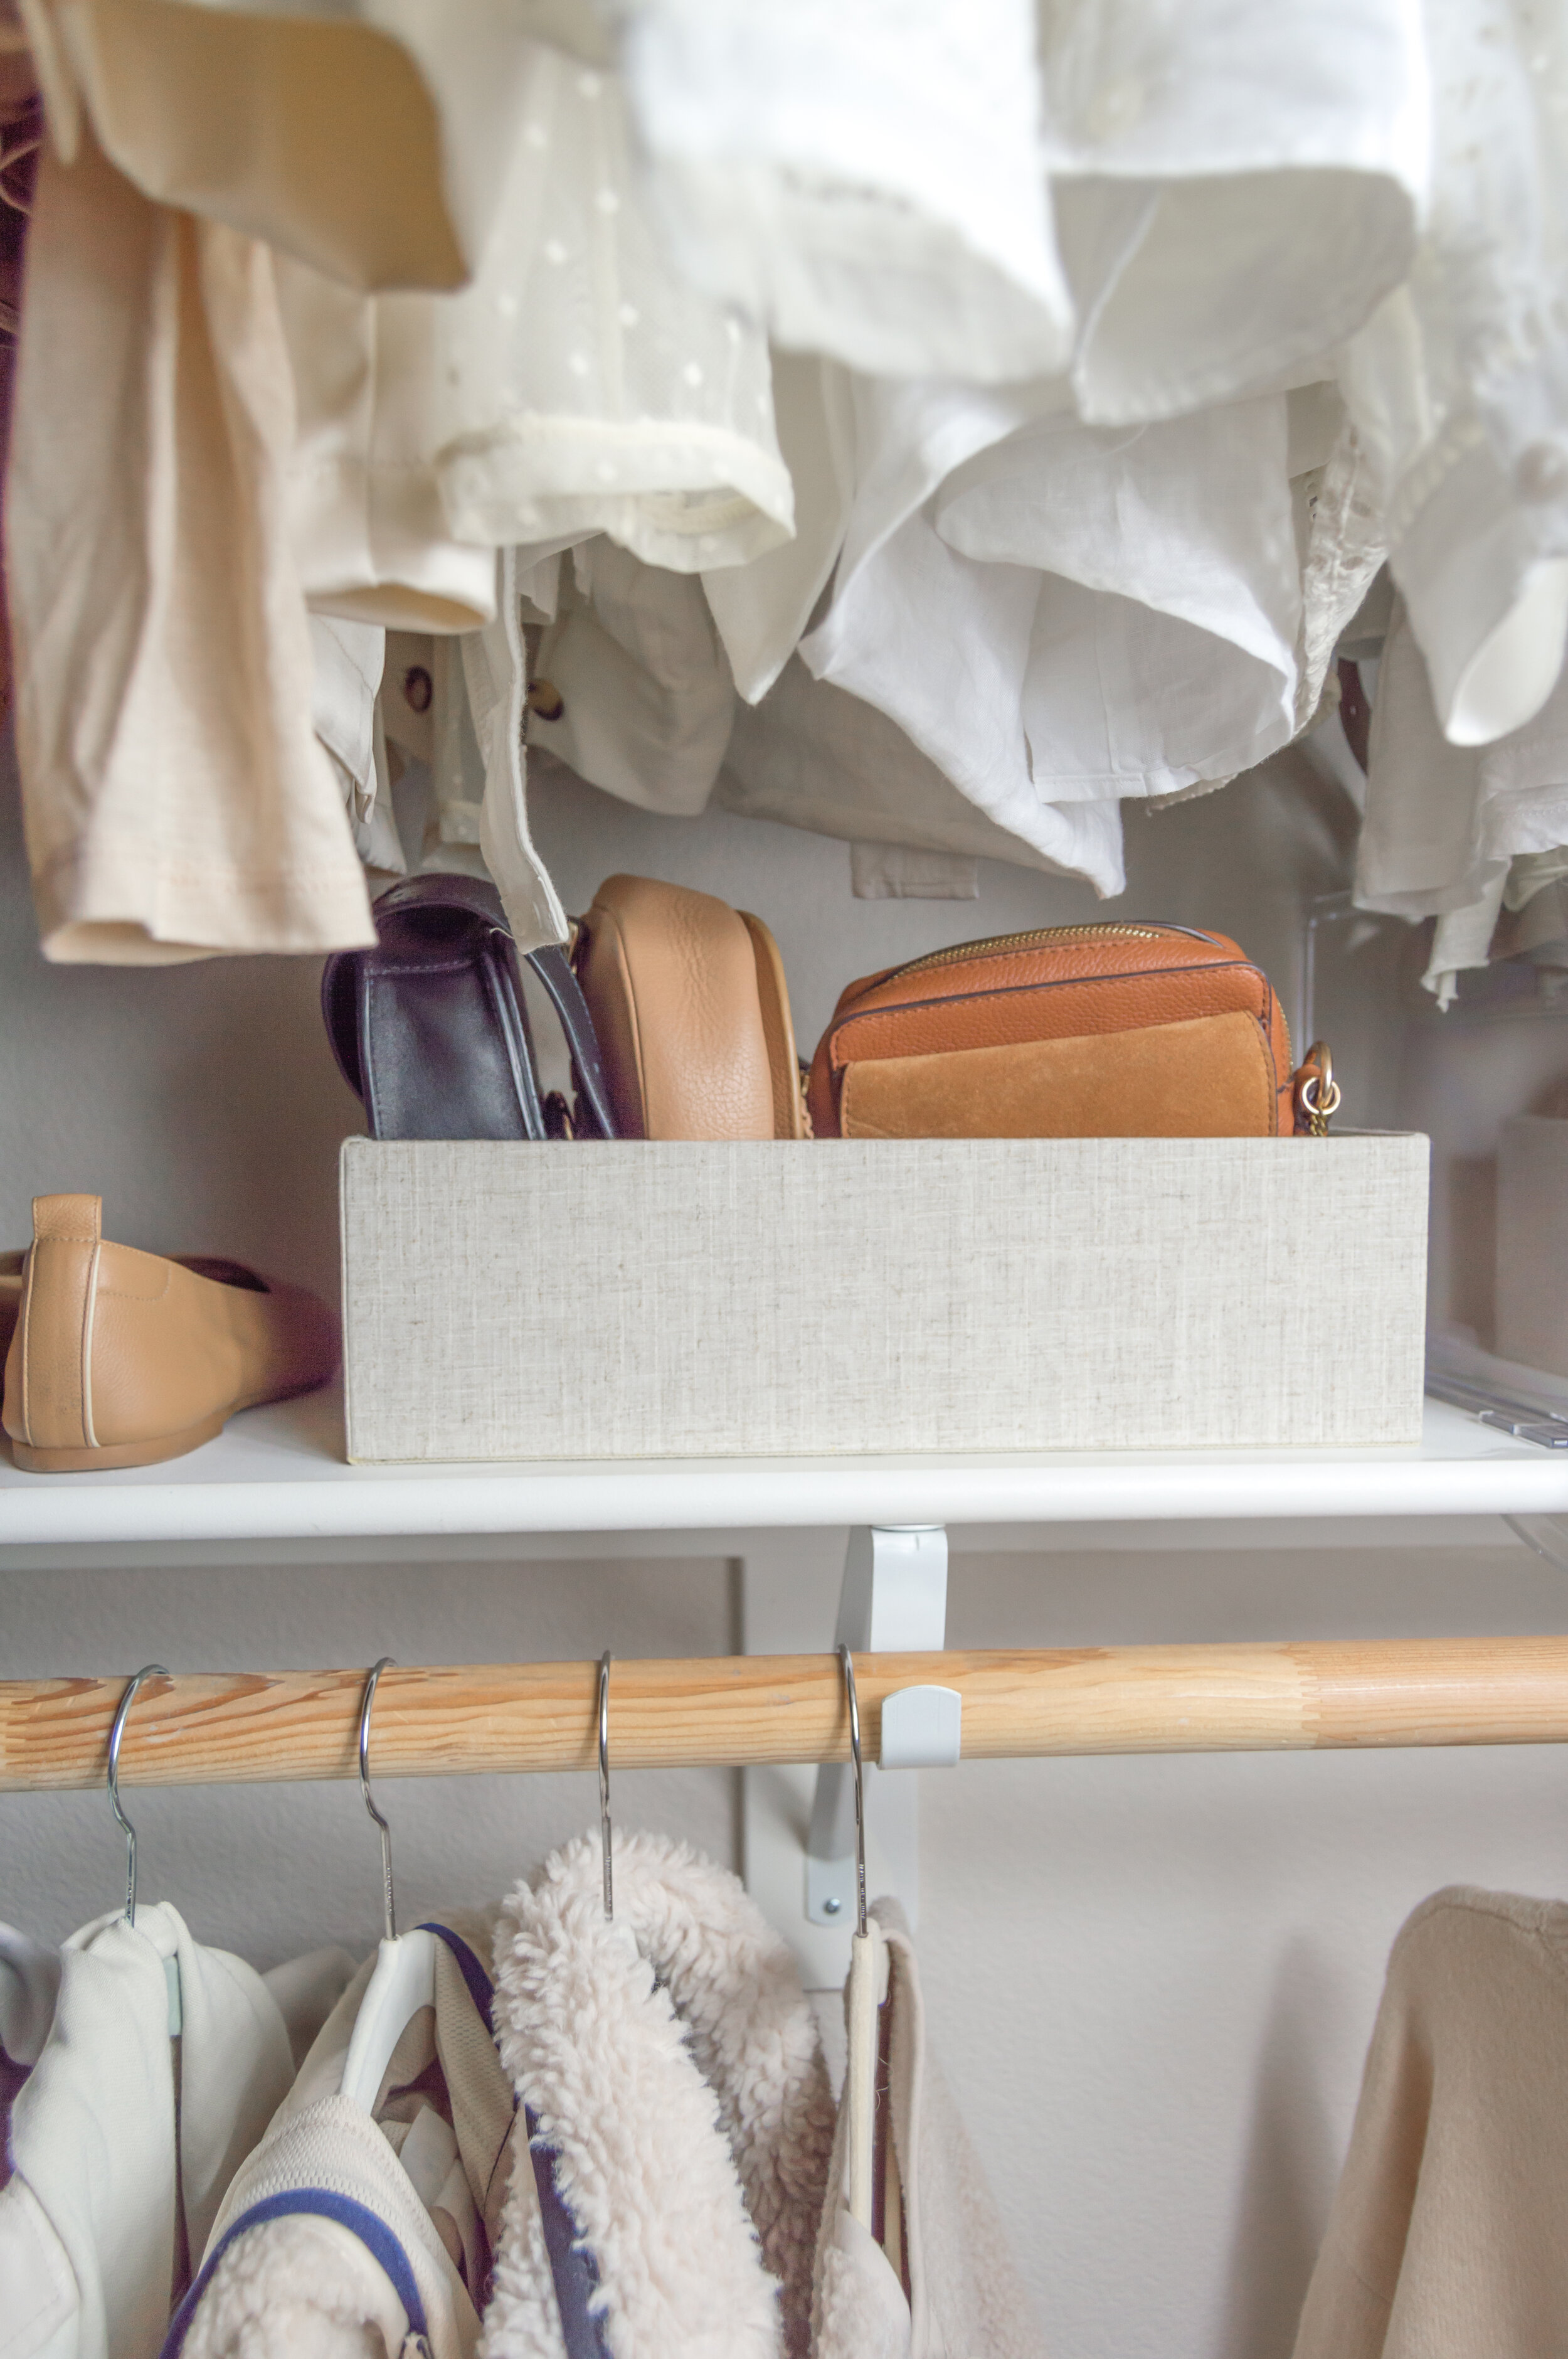
A dedicated spot for accessories and bags - so they’re not on the floor or hanging from every chair in the house.
After a few initial thoughts from Holly, I was ready and excited to get started. She took a few measurements, snapped a few photos and we scheduled our next visit: the edit and organization.
A few weekends later, Holly arrived for a set 3-4 hour session. Not a whole day. Three to four hours. I have to say, having this dedicated window made it instantly feel less overwhelming. Of course, having a professional involved to help sort through the process (both literally and figuratively) was a massive motivator but the time window also seemed to have a huge mental impact. I could handle a few hours. A few hours was really all is took to go…
From this

To this!

Before

After

Before

After

Before

After

The Steps
Step 1 - Taking it all out. Section by section
We started by pulling out sections of my closet: tops, sweaters, jackets, etc all came out in sections. I loved this method because it instantly felt less overwhelming than dumping everything out. It also allowed me to visualize how many items I really had in each category. When we got to denim, for example, I was more prepared to part with styles because I could see the abundance within that specific category. I had focus.
Holly’s organization approach (in quotes) FYI, you can see Holly’s full story of our process here
Once you've gotten clear on your style meeting your lifestyle, it's time for the big pull. Find a spot in your room where you can review all the items – a bed is my surface of choice (wow, that sounds weird). Start with the tops (blouses and shirts), sweaters, jackets, dresses, pants and skirts. Next move on to athletic/athleisure, sleepwear, swim, underwear, bras, socks. Then bag, accessories, and shoes (saving the best for last, right?)
Section by section (no, do not empty your closet all at once!), you'll begin editing...


Step 2 - Editing
This is the most important step in creating a wardrobe you love – eliminating what you don't love, don't wear, don't need, or don't feel good in. Hold each item and ask yourself these questions:
Do I wear this?
Will I wear this?
Does it fit?
Would I buy it now?
Could someone else enjoy this more?
Do I love the way I feel in it?
Of course, you don't have to ask yourself all these questions for each item. It sometimes only takes one question, and the most helpful is usually the last one: "do I love the way I feel in it?" Or it's even easier than that, and the item simply doesn't fit or there's a stubborn stain. But if you're stuck, ask yourself more questions. Remember, you want to simplify! - Holly
Piggybacking on Holly’s tips, I’ve recently been focusing on how I want to feel overall. This might sound silly but I ask myself:
“Does this make me feel chic?”
“Do I feel effortless in this?”
I’ve found this incredibly helpful both for editing and any new potential purchases. Maybe your “words” are different but it’s a quick and easy way to “check yourself.”
It took me a while to realize I just don’t love *most* v-neck styles (especially tees) because I don’t feel effortless in them. I love relaxed fits but I don’t feel chic in a slouchy, v-neck tee. Pay attention when you don’t feel good in something and trying to identify the why behind it. I love the idea of a capsule wardrobe but wardrobe needs vary so drastically from person to person. Not everyone needs a white v-neck. If you don’t love it and feel good in it, you don’t need it.
Piece by piece, we went through my closet and some items were easier than others. If it was an easy “no", the item instantly went into the donate basket. A “maybe” pile to the side. The “keep” items got to stay - don’t put them back in a pile. Holly brought a mini clothing rack for “yes” items hung prettily on velvet hangers.


Step 4 - Create an Organized System
With my categories edited down, I was shocked at how many empty hangers now sat on the floor. The box I filled with shoes and the overflowing donate pile to show for our progress, my “keep” pieces now went back into my closet.
Once you've paired down your closet and you're left with only the items you love, it'll be so much easier – and fun – to organize. PAUSE. This is not where I say you need to go and buy a bunch of organizing products. You might even already own more than you need now that you edited your wardrobe down. You'll likely have a pile of unused hangers, empty shoe boxes, and perhaps a few random containers hanging around. So start with what you have.
Recycle the mismatched hangers and try to use all one color. If you're going to make a purchase, get all matching hangers. This will make a big difference in your closet, and be the most budget-friendly.
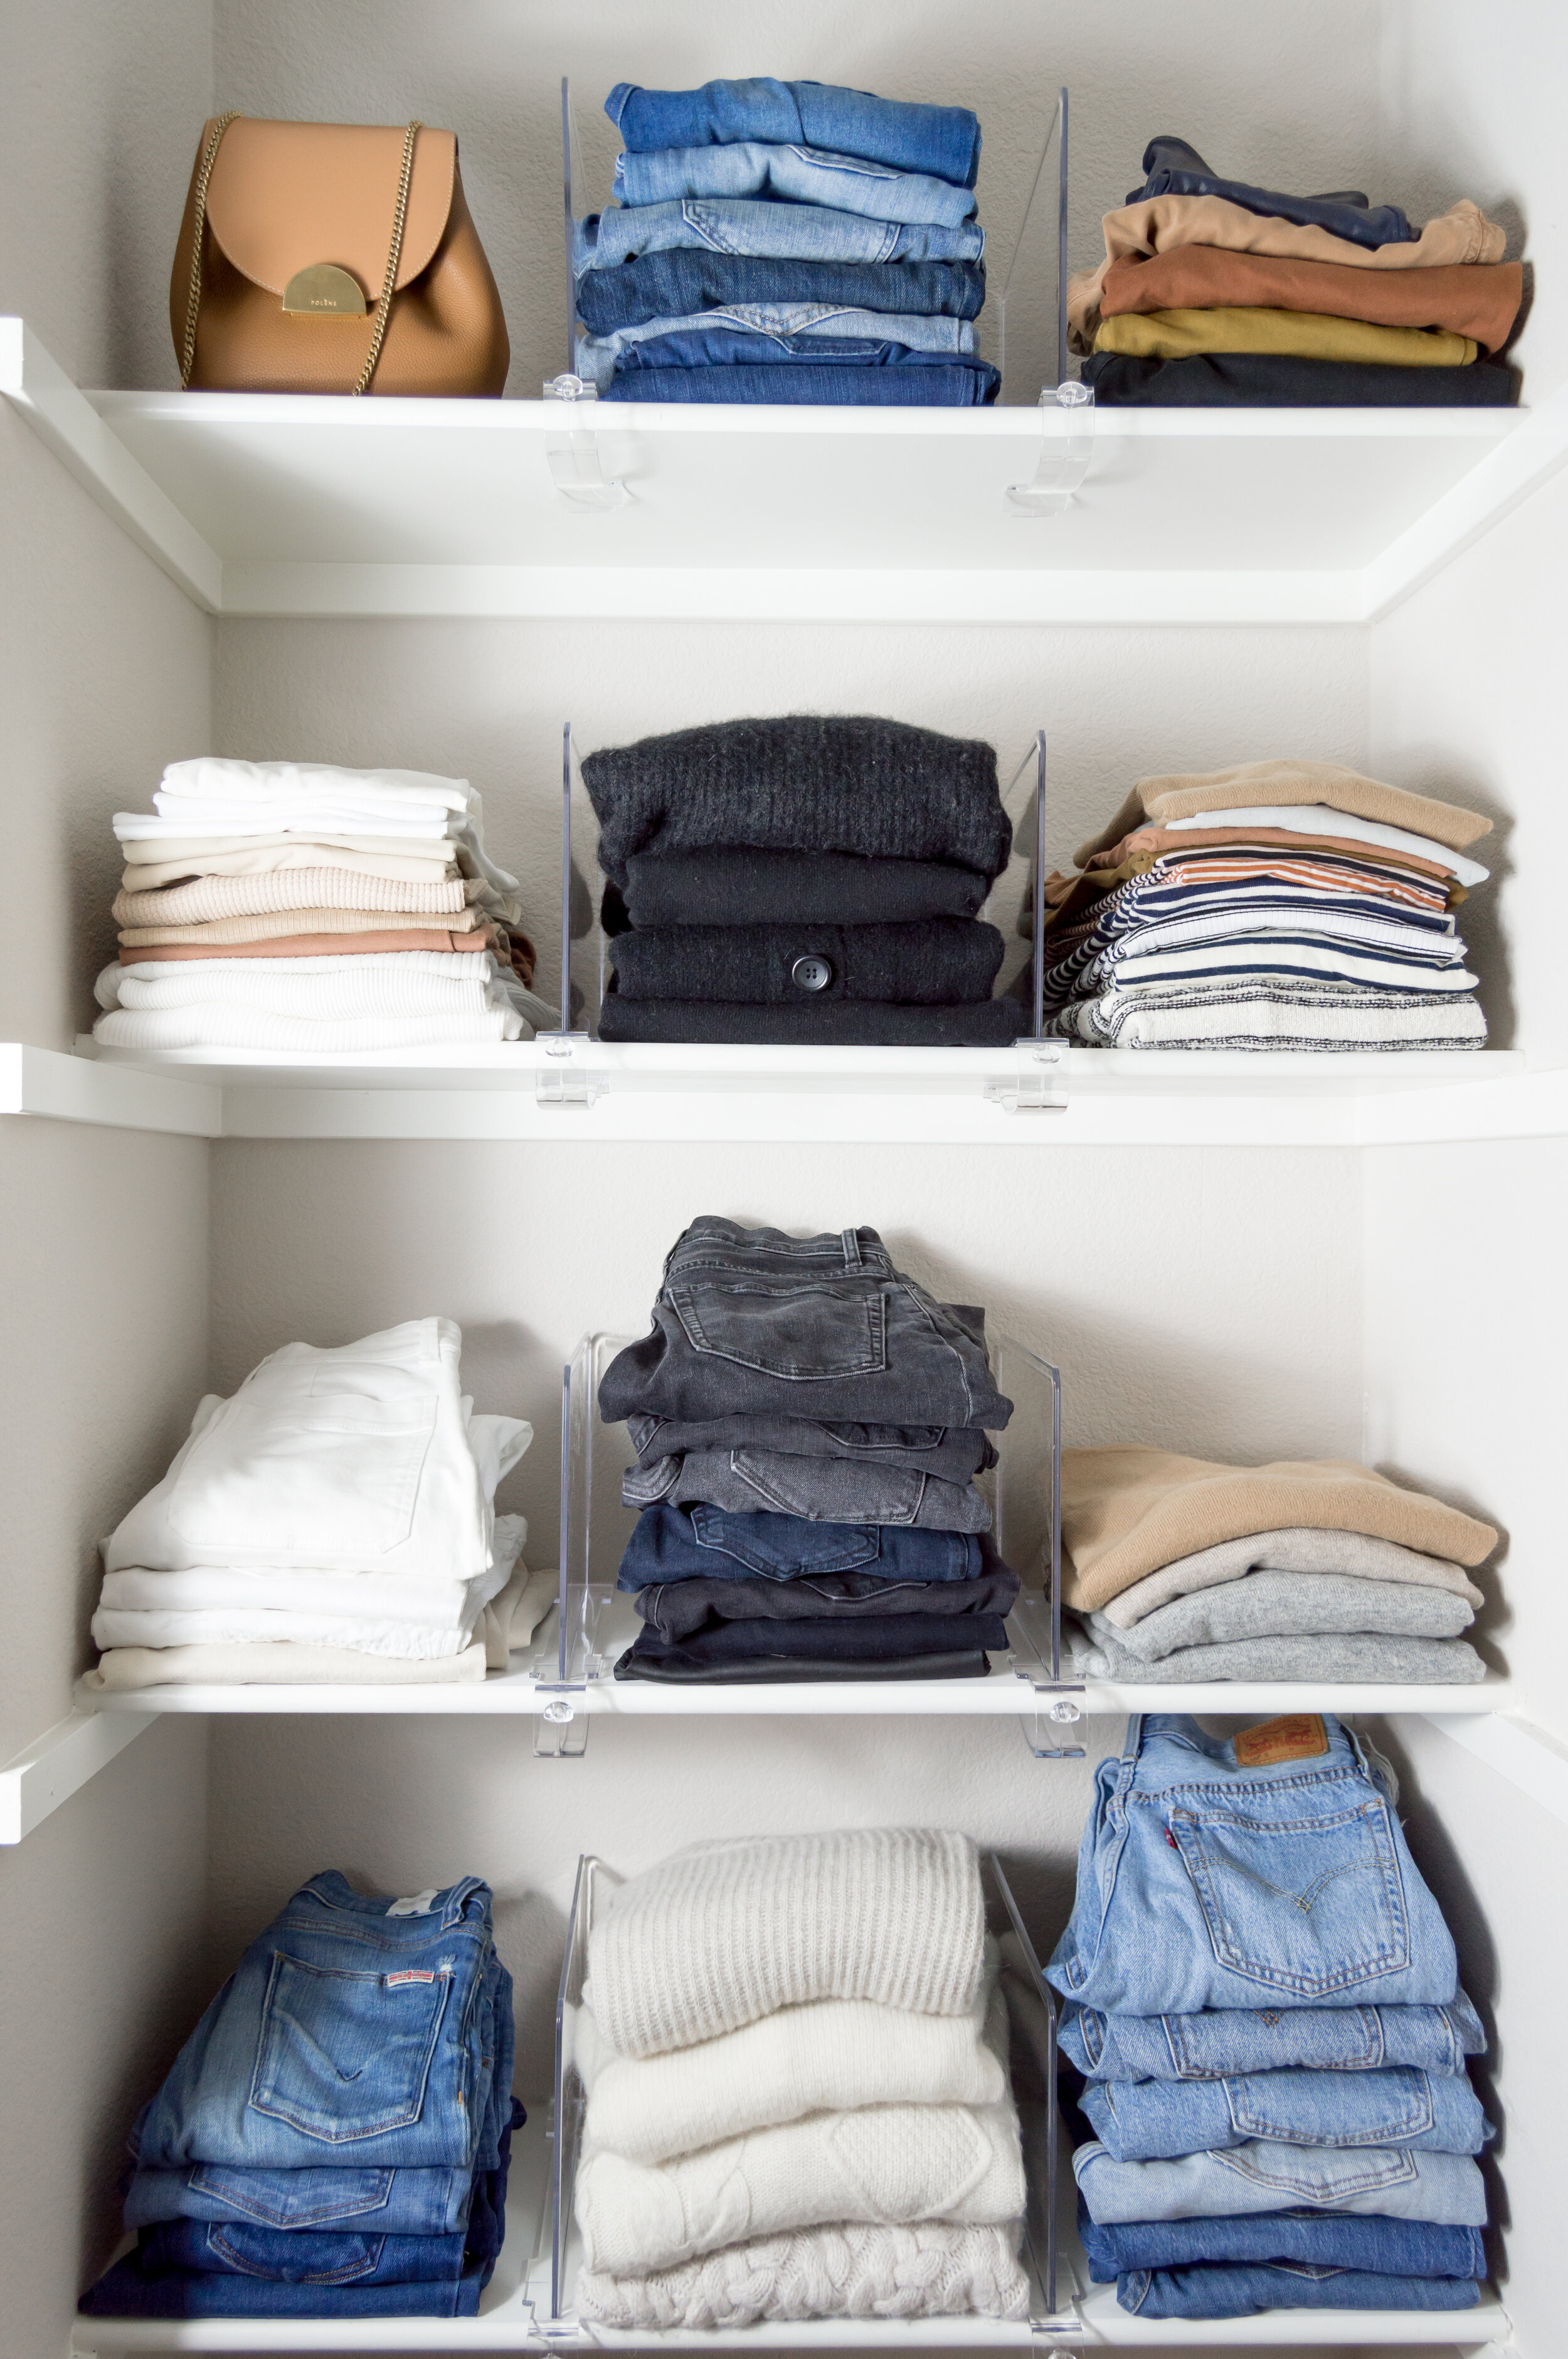
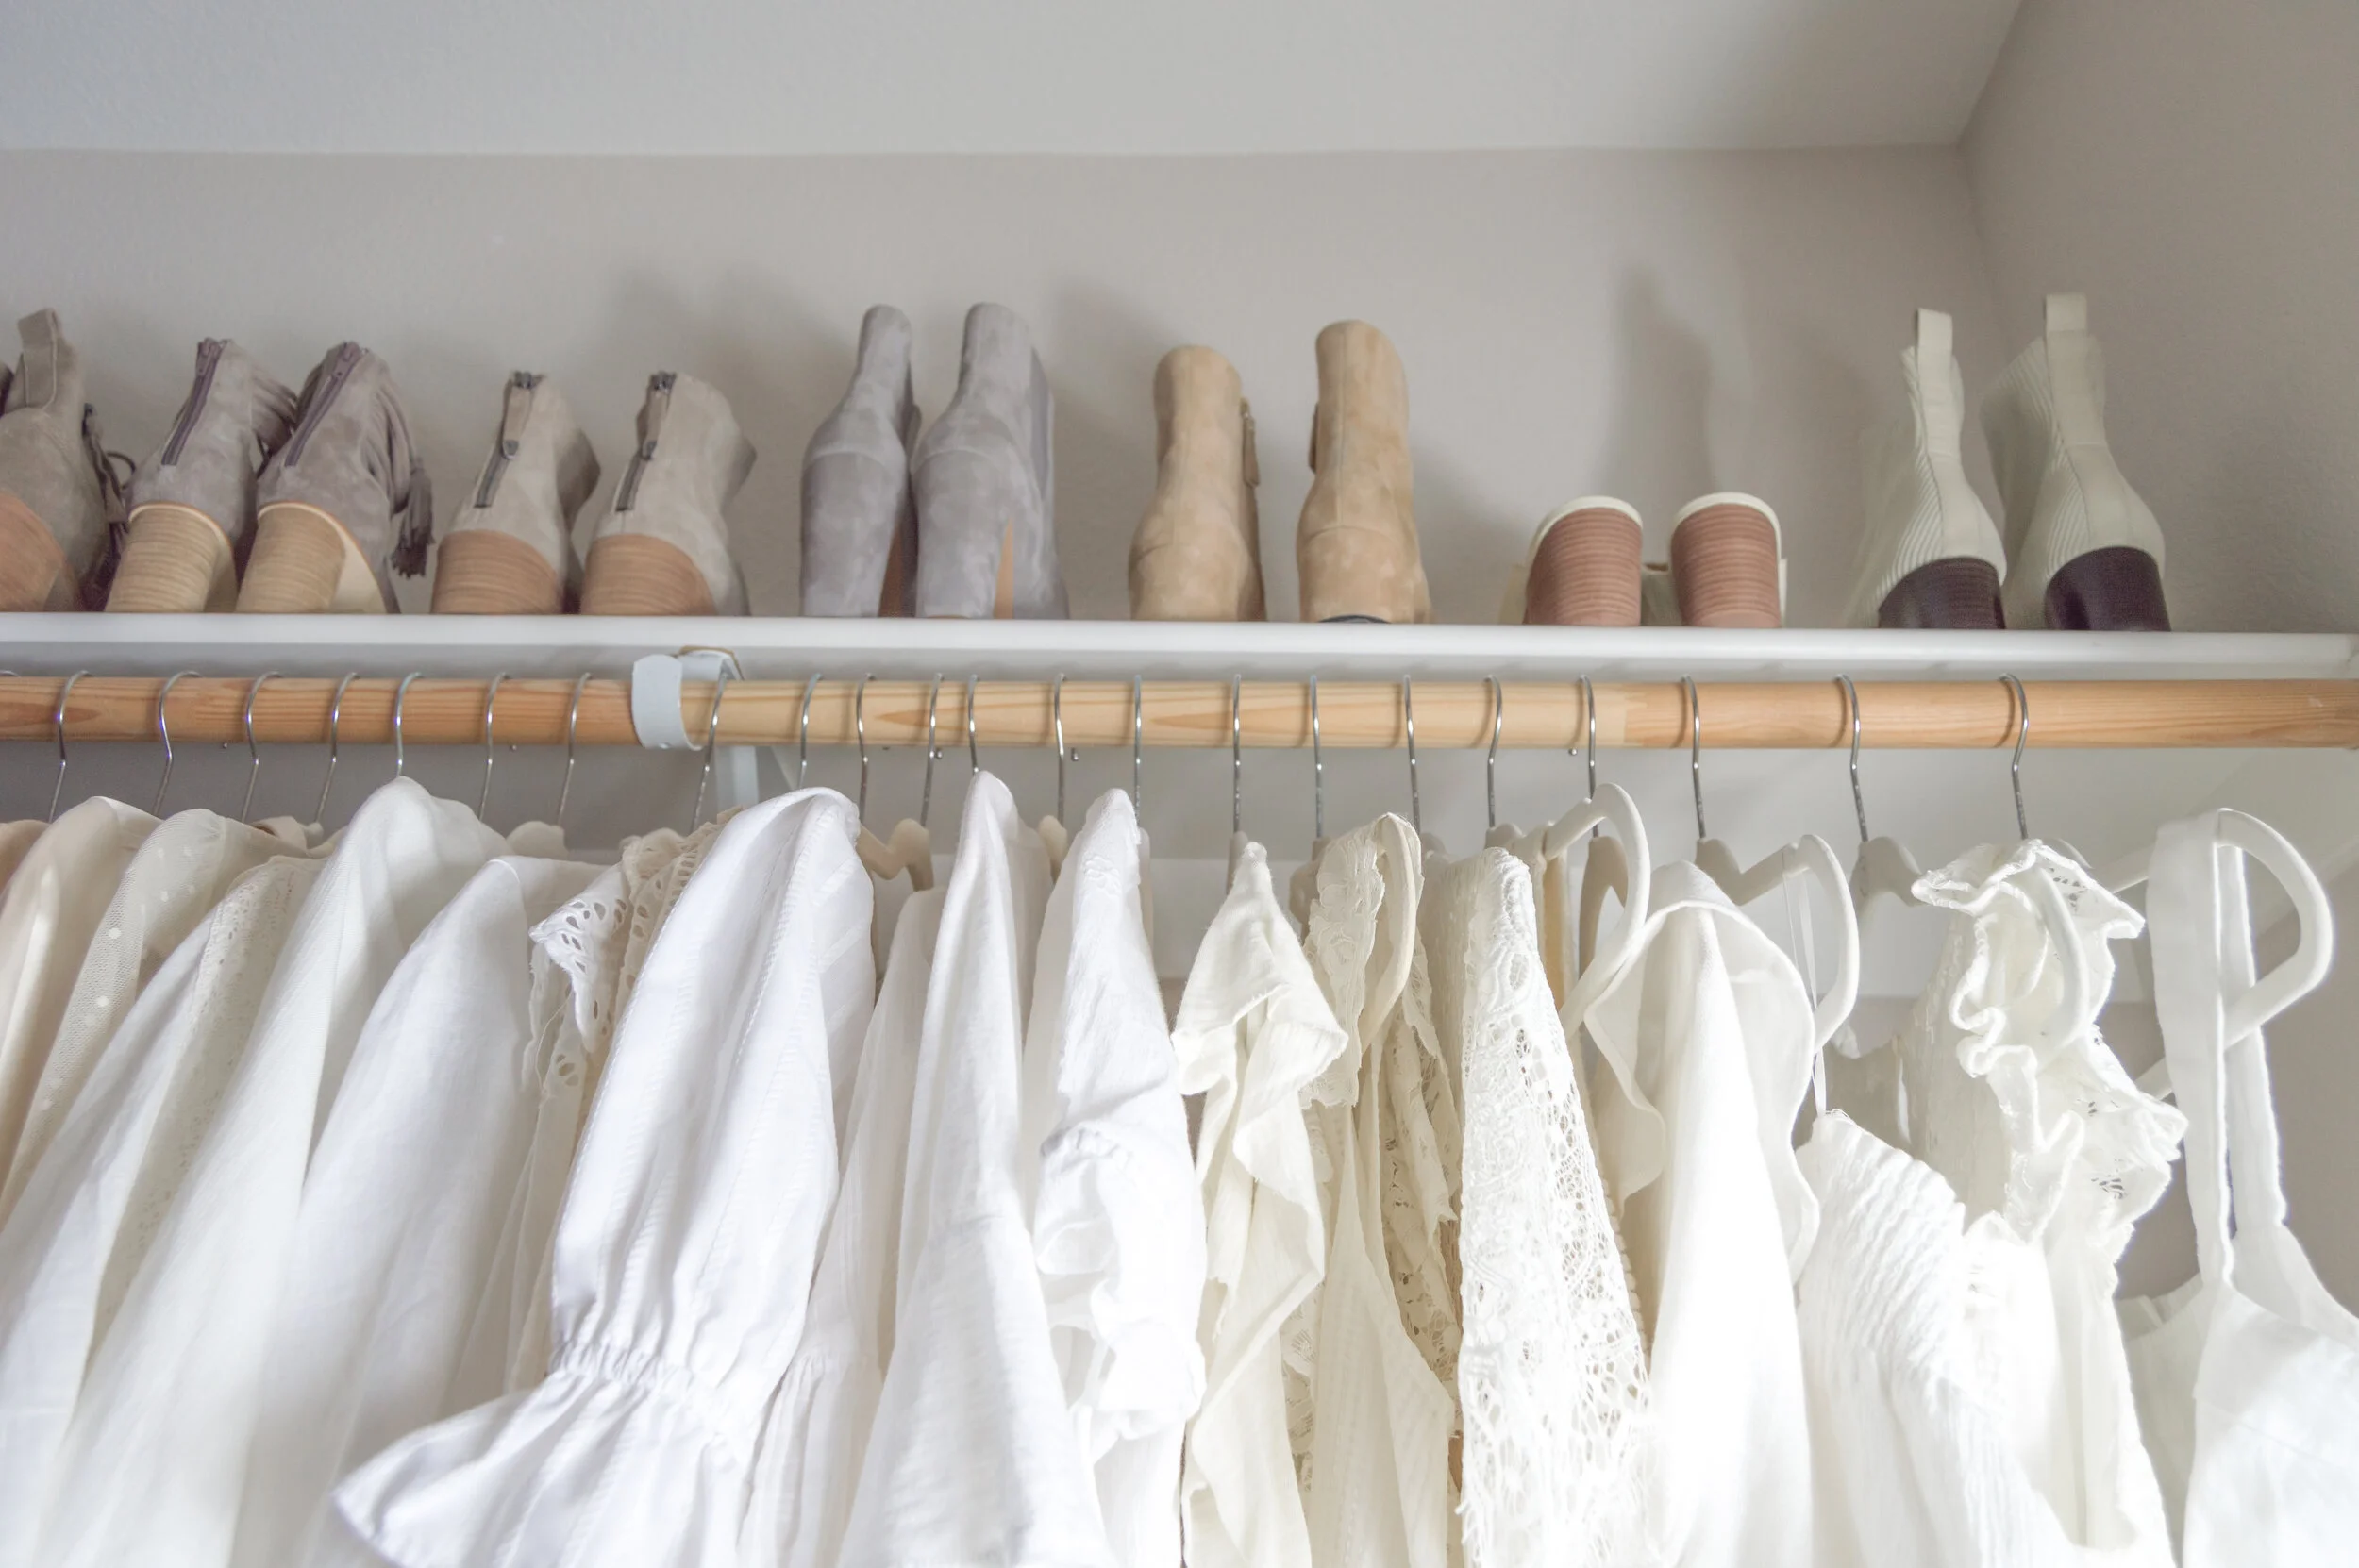
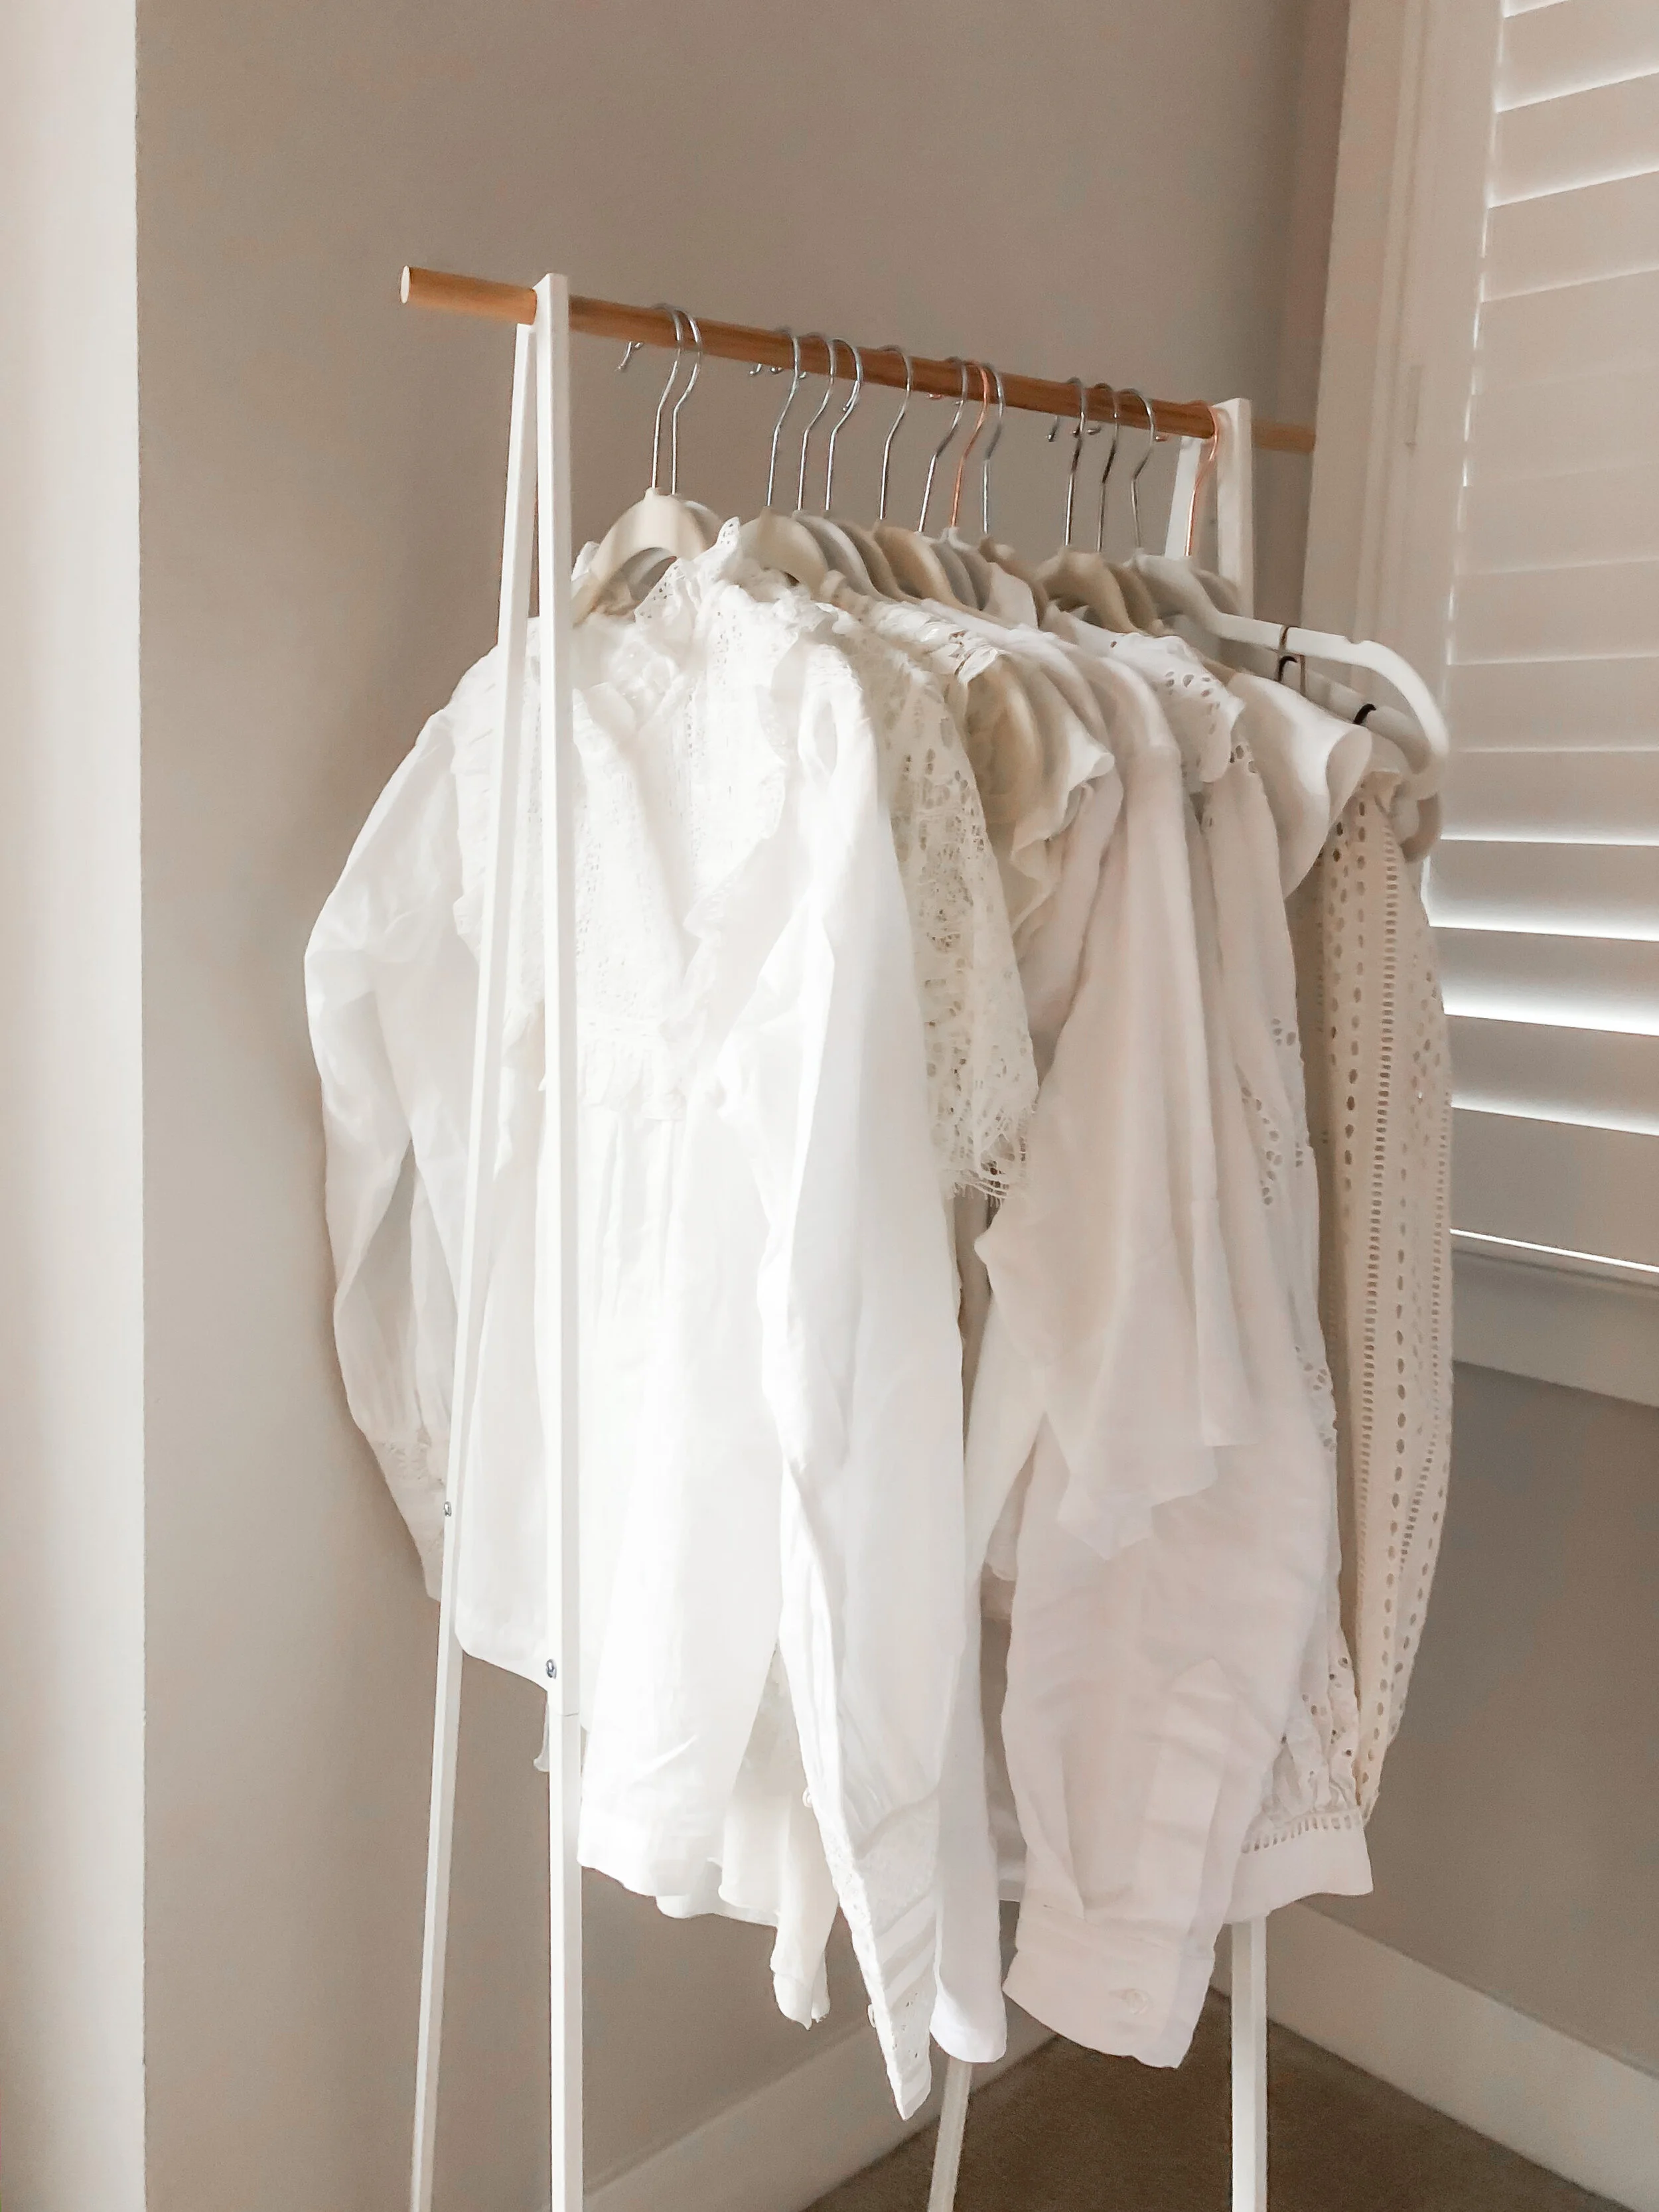
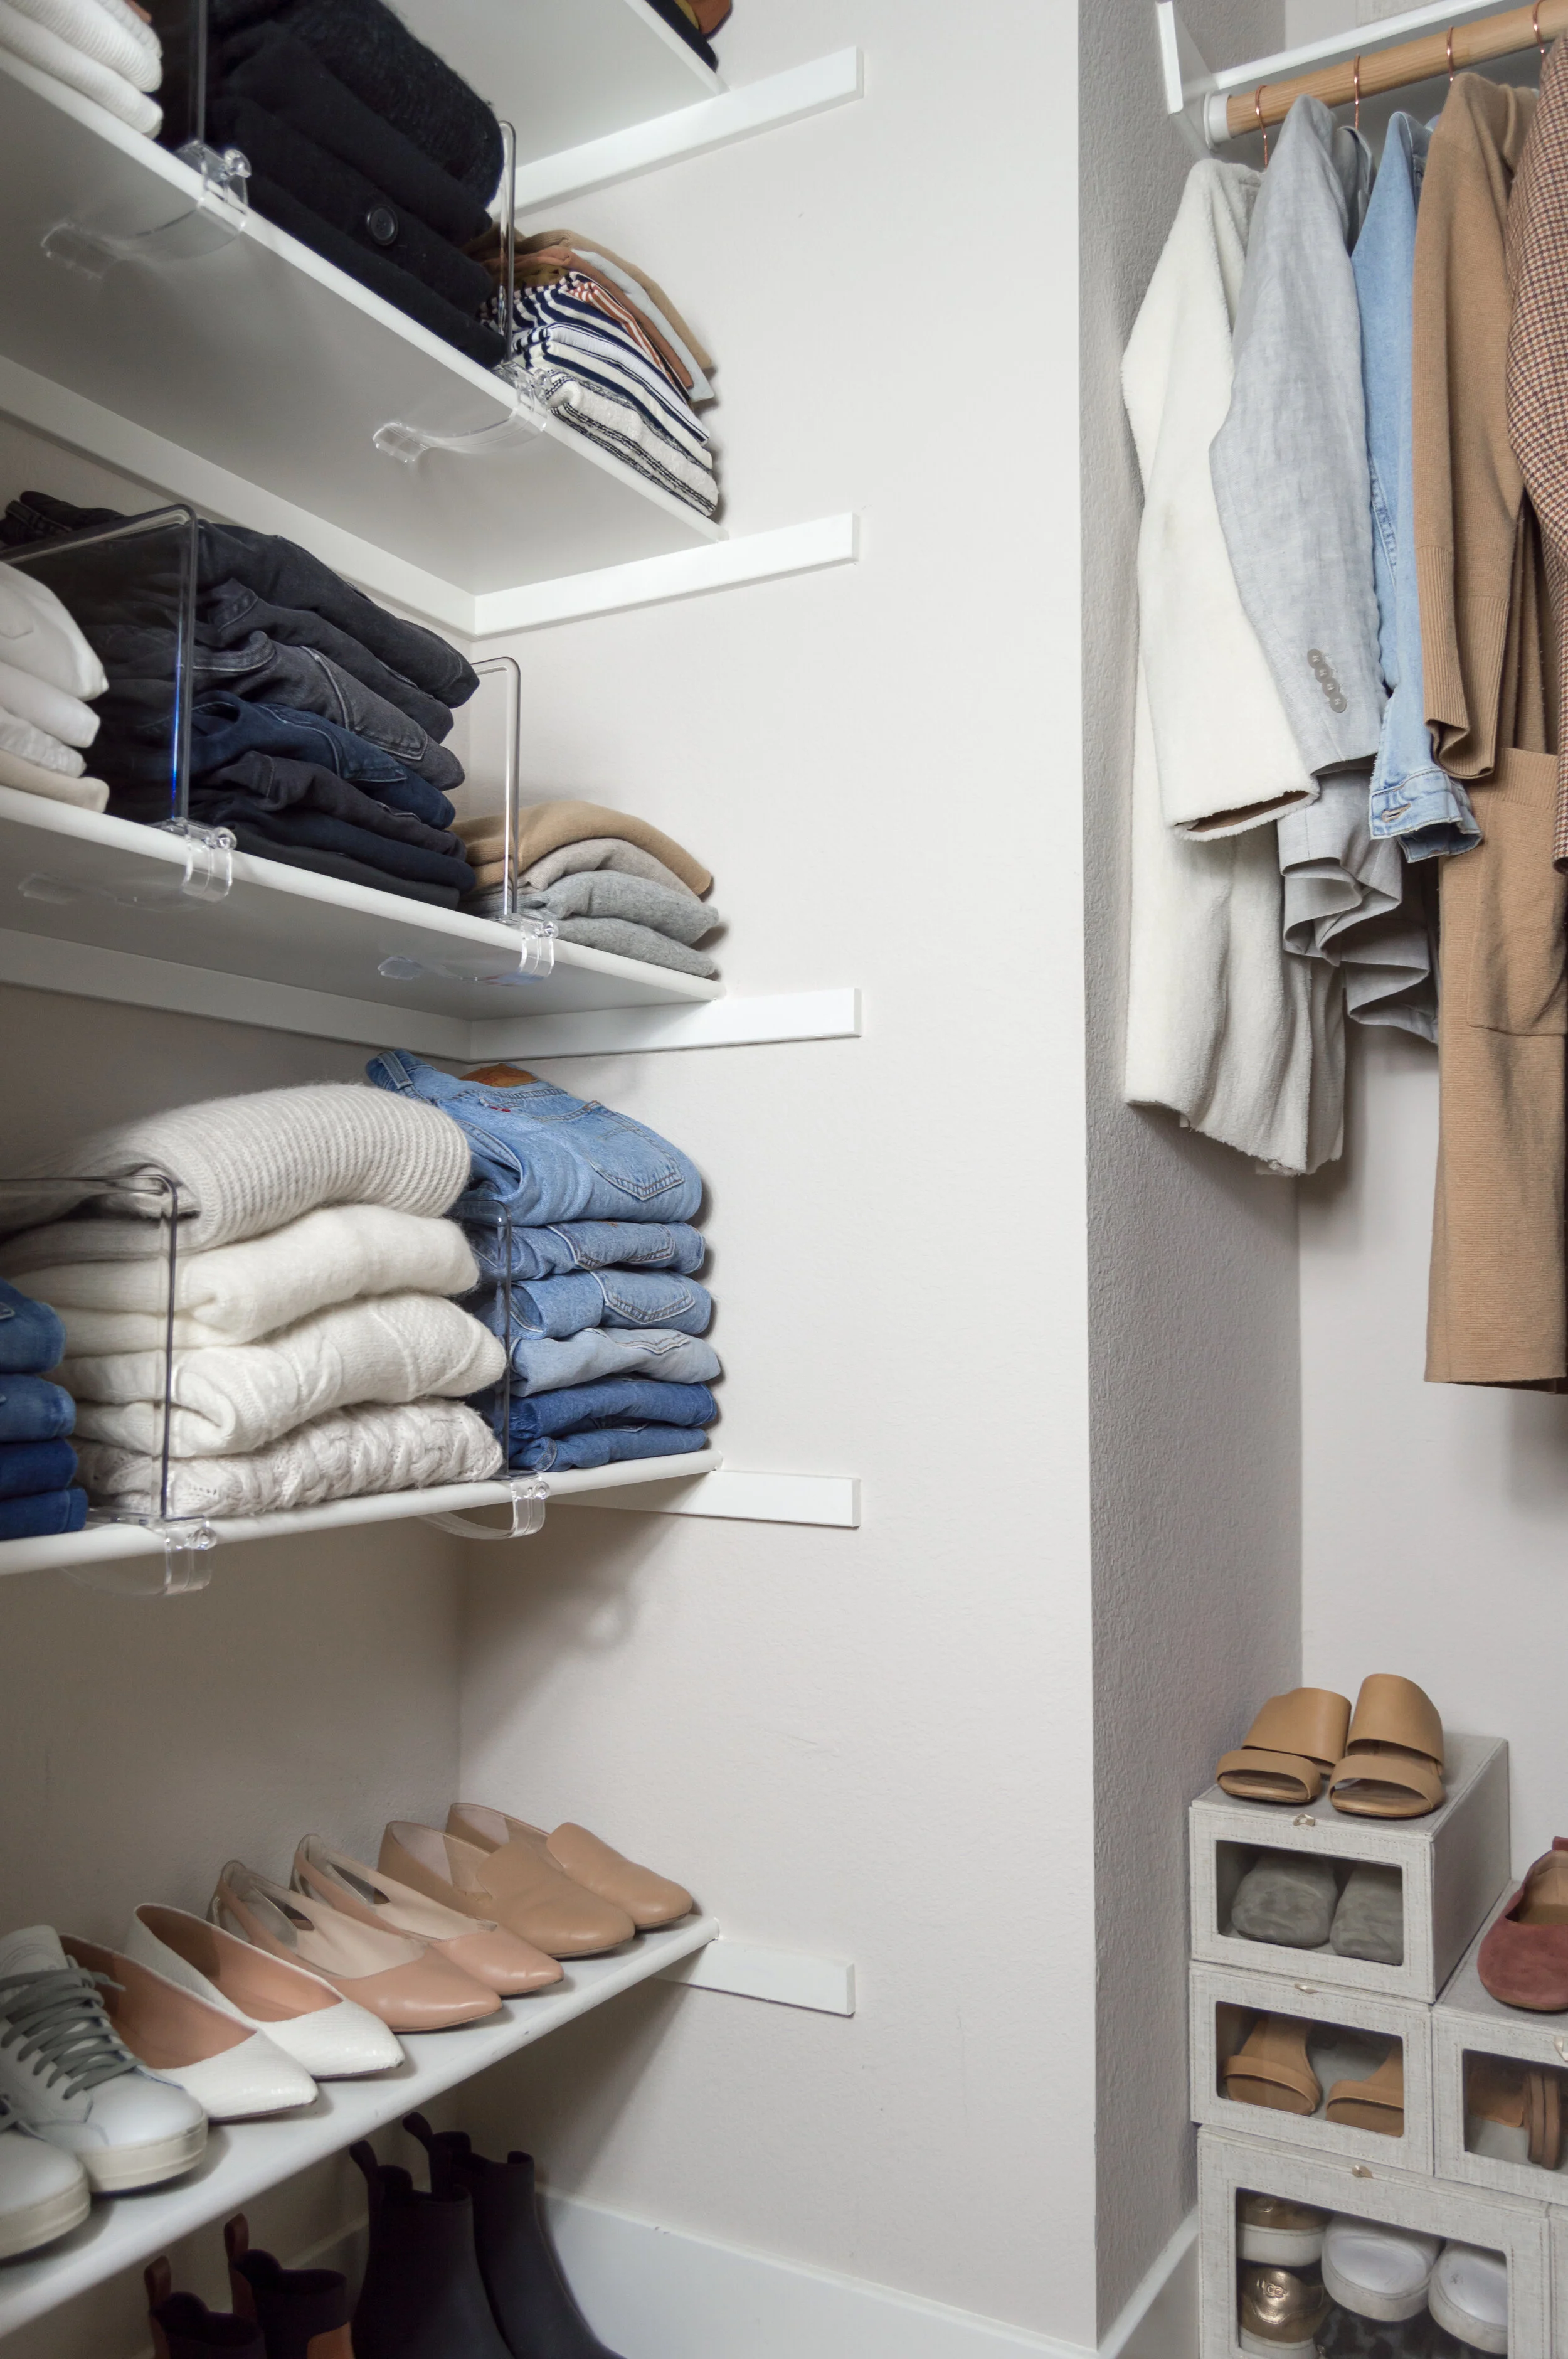
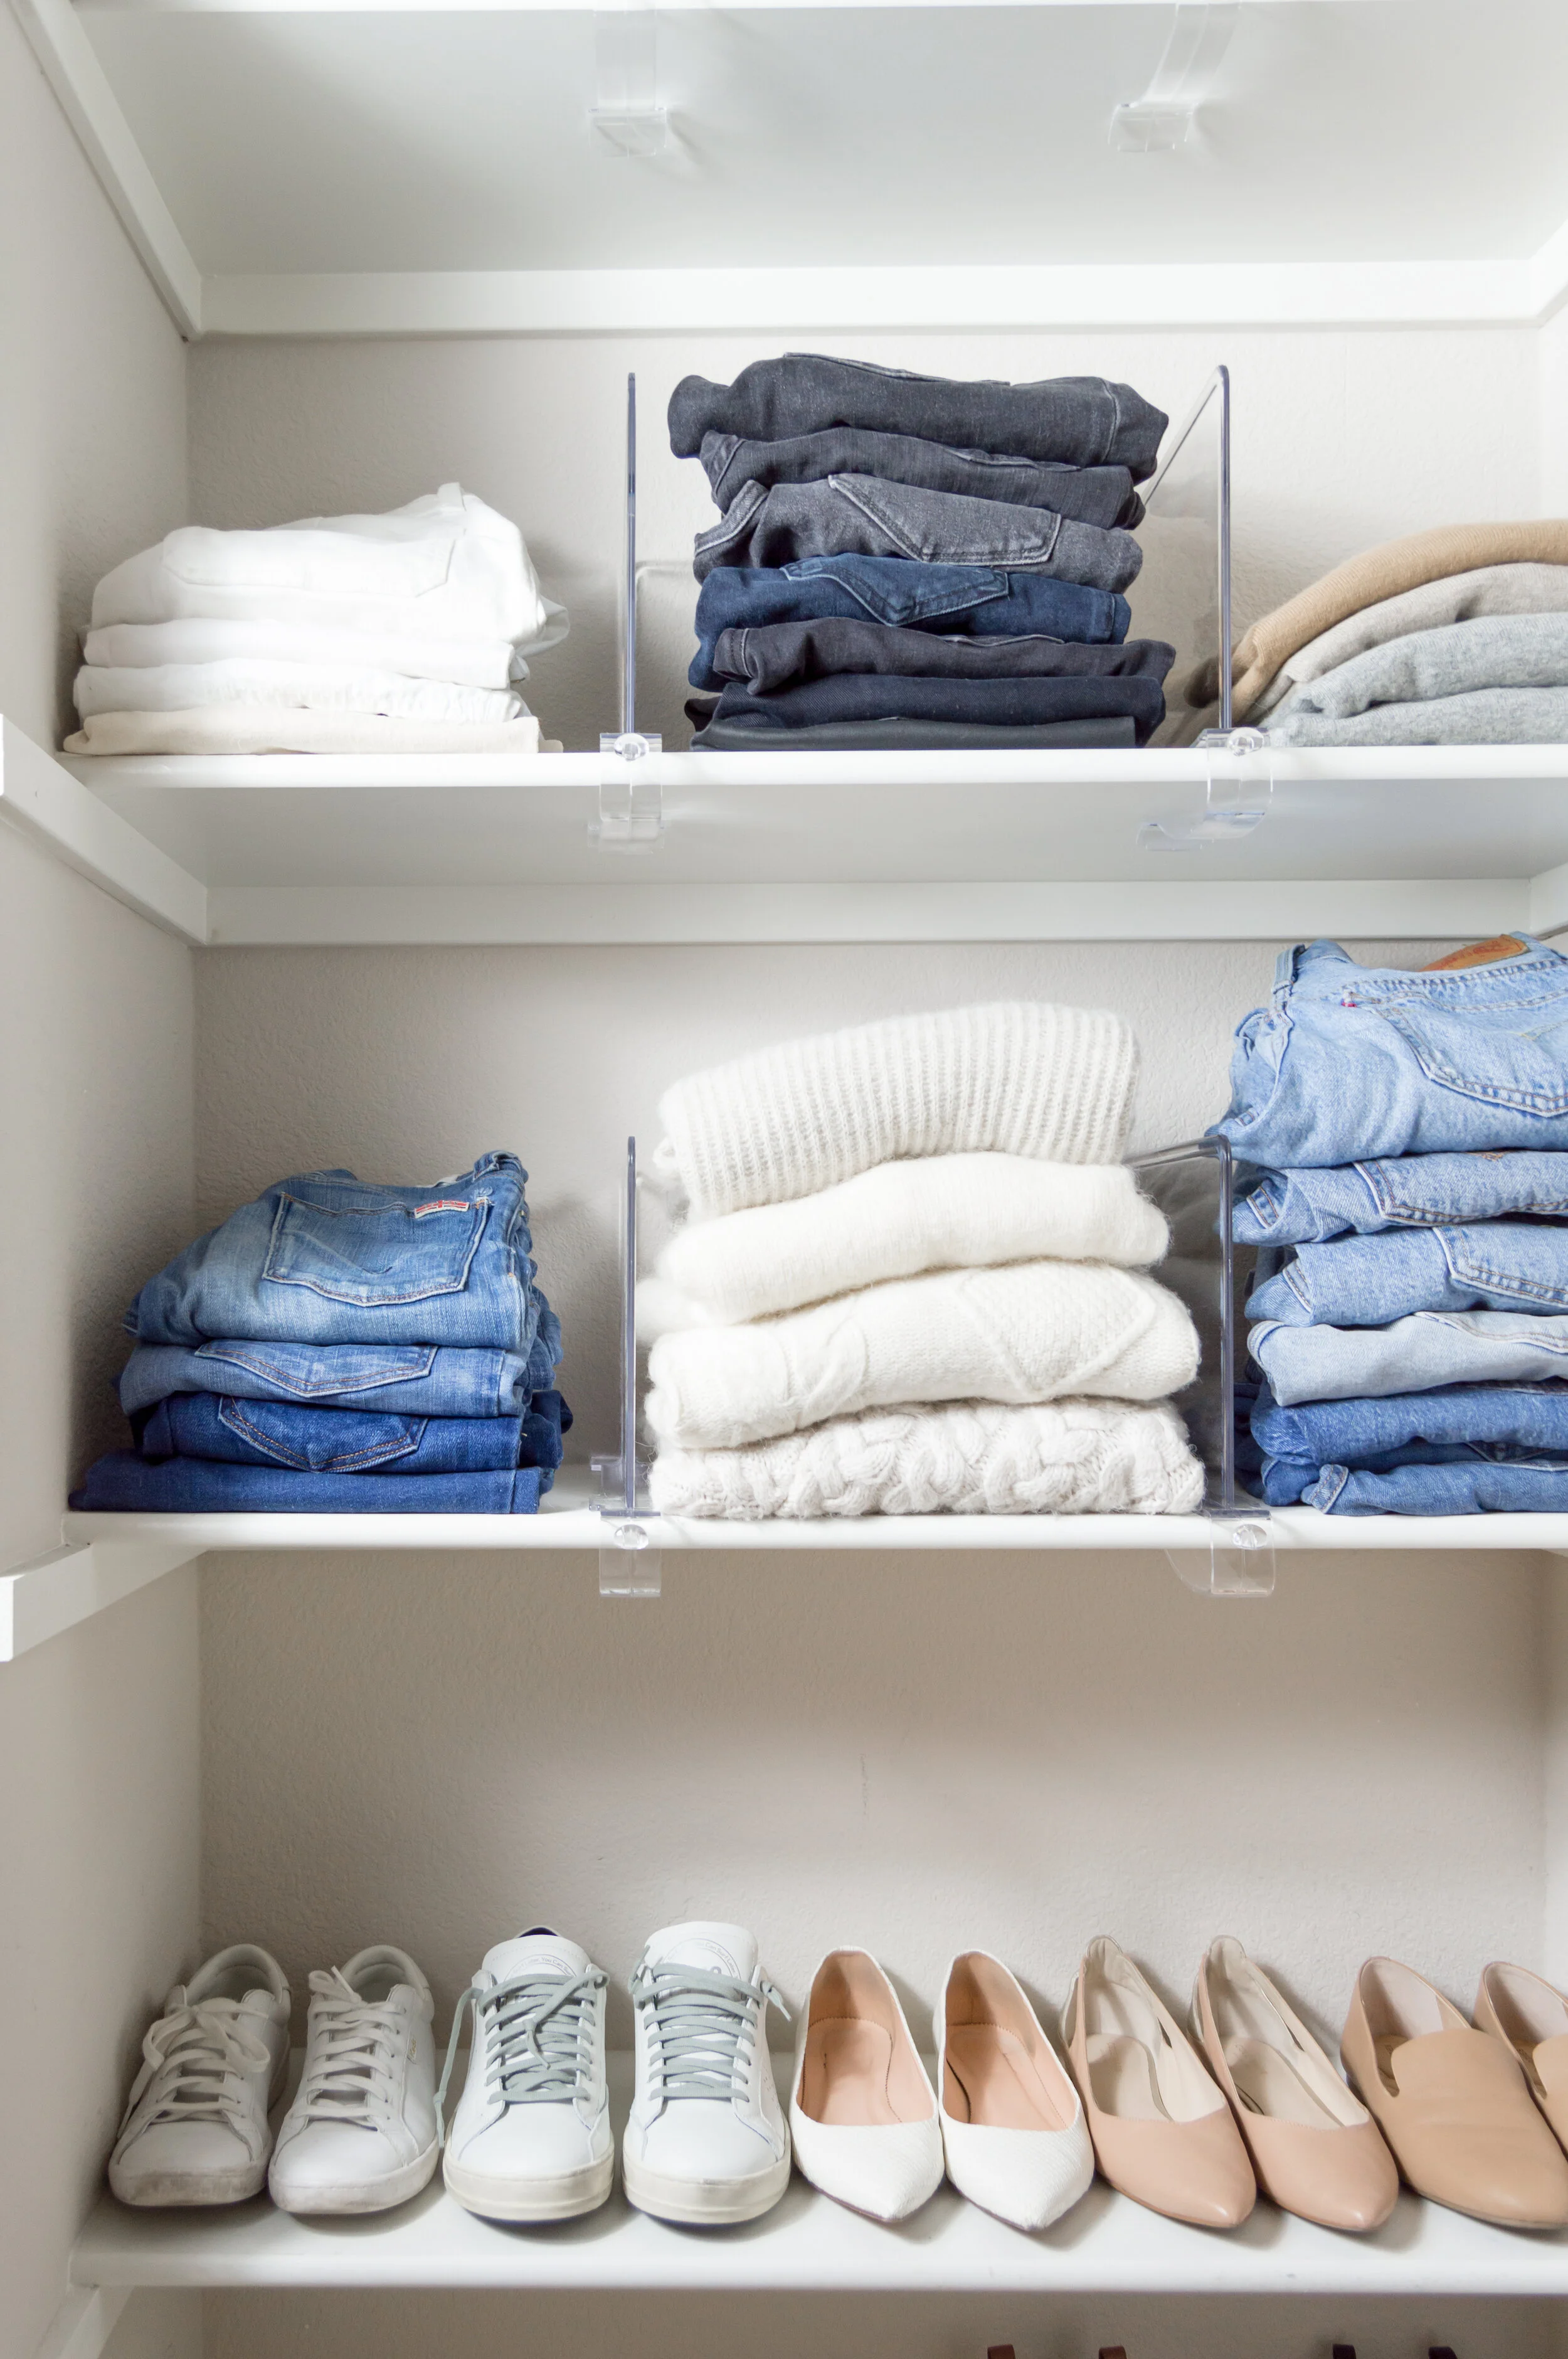
Create zones for your categories, in areas that make the most sense for retrieval. This means your capsule should be front and center, easy to reach. For Tyler, this meant that her jeans, sweaters and most worn shoes were neatly stacked on the open shelves. We hung her blouses (white first, of course) on the opposite side, with jackets and outerwear below. In the back of the closet, we hung dresses, shirts, formal coats, and special occasion outfits. Athletic wear, socks, underwear, and bras stayed in the dresser. Boots were lined up top in the closet, and the remaining shoes were placed in drop-front shoe boxes, stacked under the dresses. Purses, belts, and accessories were grouped in matching open boxes on the shelves. And last, we created a hanging zone for "outfits to shoot" at the front of the closet to act as a physical reminder of what's next.
To maintain a tidy closet, keeping your most used items easily accessible (which also means easy to put back) is key. Besides selecting smart locations for your items, you don't want to over contain them. Keep containment simple. If you're constantly having to open a box top to retrieve shoes or a sweater, you're going to end up with a lot of shoes on the ground and a pile of unfolded sweaters.
A few of my favorite simple containment products include clear sweater and pant dividers, open boxes to place small purses and accessories in, and "S" hooks to hang larger purses on. If you lack shelves, you can always buy some drop-front sweater boxes to create make-shift shelves and maximize storage. - Holly
The Reveal


I think it goes without saying but I am thrilled with the results! I’m still in awe at what we were able to accomplish in such a short period of time and I feel so much less overwhelmed walking into my closet. We reduced my wardrobe by half, created a structured wall of my most-worn pieces, added storage bins and boxes for separation and organization, used open bins for mini bags and accessories, streamlined my hangers, added hooks to hang bags.
A few impactful details…
Shelf Dividers. These acrylic shelf dividers were such a simple way to add structure and something I never would have thought of. Holly used the dividers for my “capsule” wall and I absolutely love how it instantly keeps things separated and tidy. Everything has a place (their own little section), so it not only looks sleeker and cleaner but I find it’s been easier to keep things clean this way. I had a few questions about tips on how to keep a closet organized and I can honestly say: the edit + having a system and a place for everything has such a huge impact. It’s much easier to keep things tidy when it’s clear where things go.
“Capsule” Wall. I plan to continue to re-arrange this to suit my needs each season. While it’s certainly not a traditional capsule wardrobe, it’s filled with my most-worn pieces and is the first place I go when I walk into my closet each morning. I can quickly see my essentials and quickly grab what I need, whether it’s for work, play or blog photos.
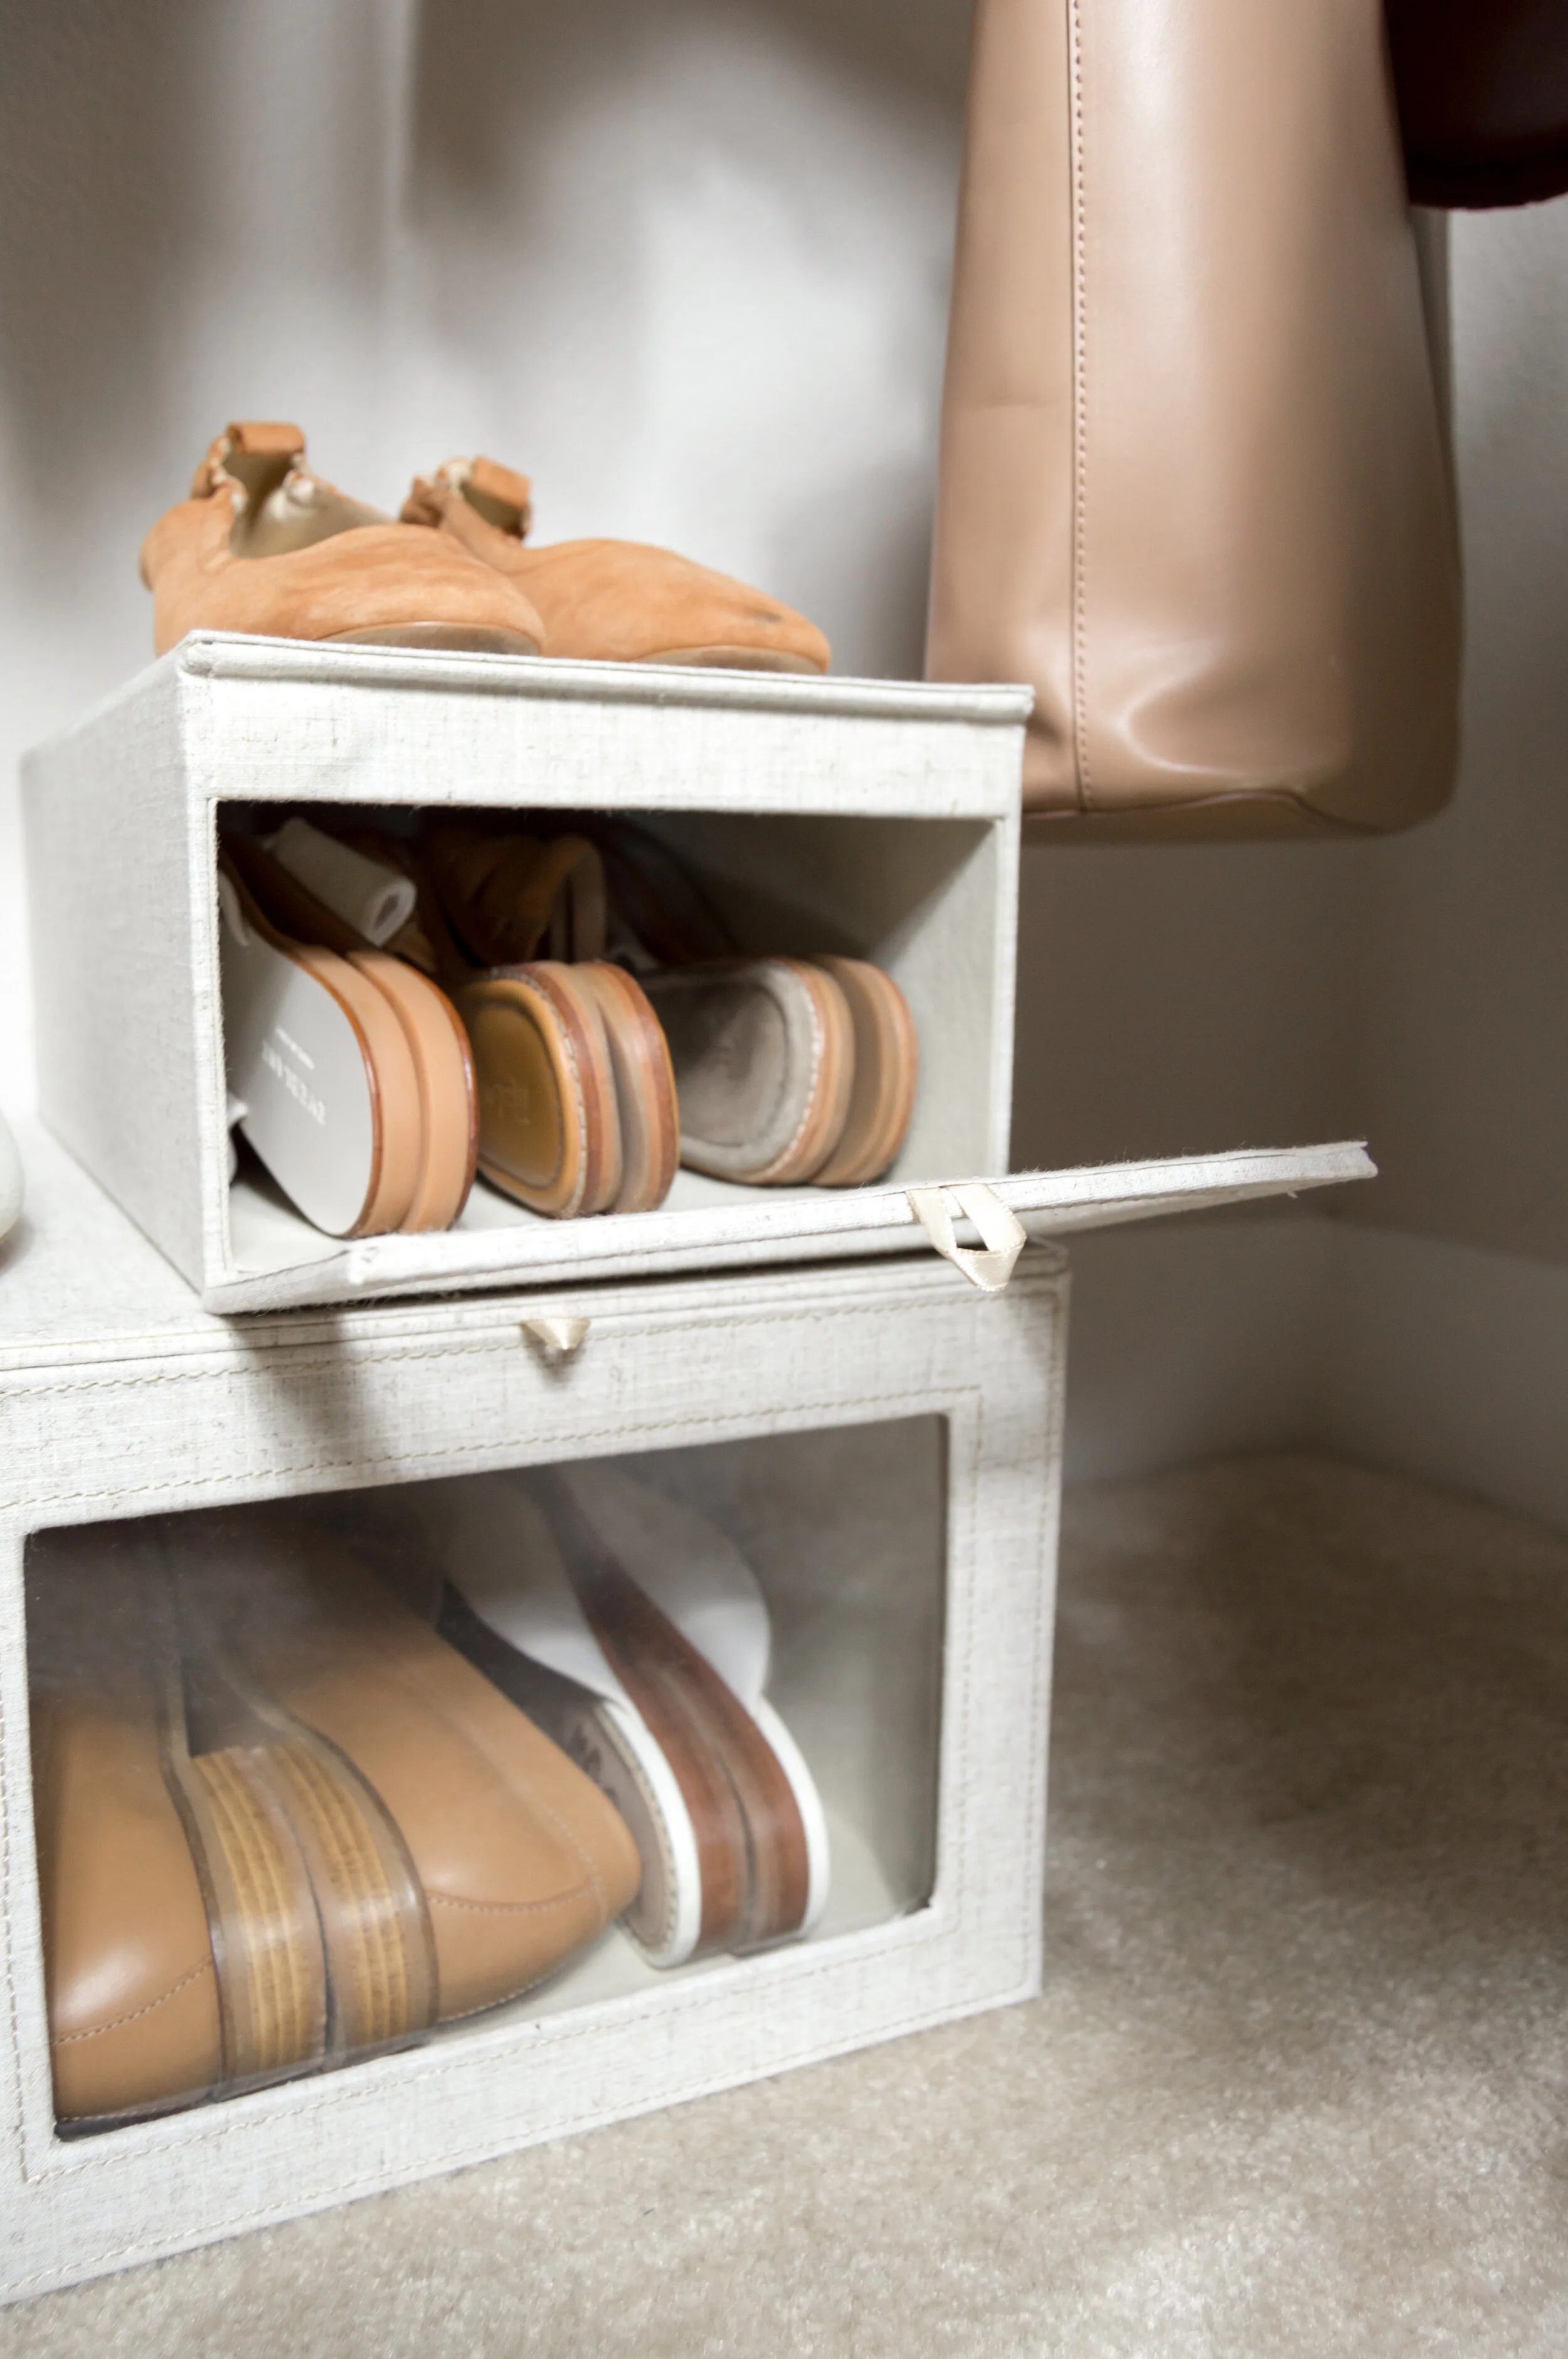
Drop-Front Shoe Boxes. Again, I never would have thought of these but I love how I can now easily store shoes I’m not currently wearing that season, like sandals, for example. Yet, they’re still easily accessible thanks to the drop-front opening.
The Products We Used

As always, thank you for reading and thank you to Holly for the help! Find her on Instagram for more organization inspiration. I wasn’t able to get to every question written in but that may be a separate post or Instagram Story. if you have any specific questions, feel free to send them in.
xo Tyler